

The RTC 2014 module is a very versatile preset counter designed to solve almost any timing problems encountered in experimental work.
Unlike most real time clocks available from computer manufacturers, the RTC 2014 is directed toward the experimental environment; lt works as a link between the physical world and the program.
The nuclear and particle physicist will use the RTC 2014 in preset-count and preset-time arrangements. The clock generator mode of the RTC 2014 not only interrupts the processor at regular time intervals but also has pulses and other controls available for the experimental equipment. Still another unusual capability of the module is its function as elapsed time meter.
The last section of this leaflet deals with the applications of the module in greater detail.
Start and Stop commands by dataway Operations or by external pulses for high precision timing.
Start pulse and Gate available at the front panel even if started by a dataway command.
Gate at the counter input for "live" timing.
All front panel signals are NIM compatible to ease interfacing with fast nucleonic instrumentation.
NB. The RTC 2014 is a fairly elaborate module. For simple, narrow range preset-count operations, the Dual Programmed Pulse Generator 2 PPG 2016 should be considered. It may well do the job at half the cost-per-function.
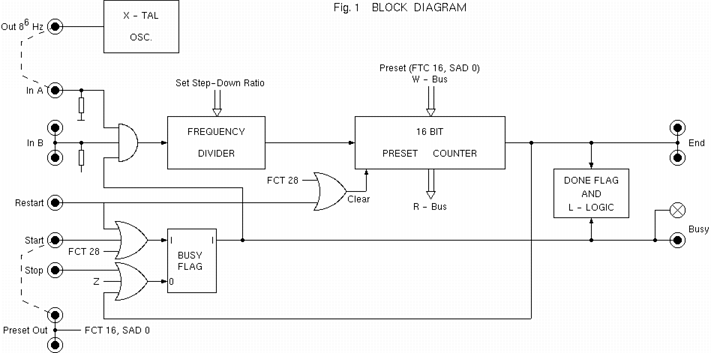
Figure 1 shows the functional blocks of the module relevant to the user. Some dataway commands are mentioned, but an exhaustive list appears in the next section.
A dataway command loads the 16 bit counter with the one's complement of the word on the W-bus. When the counter goes through zero again, it asserts the End output. In front of the preset counter, a frequency divider steps down the input rate. A control register holds the current step-down ratio. The input circuit is an arrangement that can be found in other SEN scalers: InA is a normal 50 ohm input, InB is a high impedance, bridging input, which asserts a "1" (-0.8 V) if left open. Both inputs enter an AND-gate. Thus, either InA or InB can be used to feed count pulses or gate signals. Ungated mode of operation results when count pulses are fed into InA, and InB is left open.
The crystal oscillator is an independent block; in all timing applications of the RTC 2014, the dotted line connection to InA must be made on the front panel.
Input of the counter is under control of the Busy flag. Setting Busy starts the timing or the preset-count operation. An externally supplied Start (or Restart) pulse or a dataway command sets Busy. The end of the preset-time/count operation clears the Busy flag and sets the Done flag, which might issue an L-request. For a more thorough discussion of the "Busy-Done Philosophy", please refer to the 4 BD 2021 leaflet.
The Start input simply sets the Busy flag; the counter is supposed to be correctly loaded. Restart also turns Busy on but clears the counter too. In preset-time/count operations, the Start pulse, if not supplied by the physical equipment, can be derived from the counter load command through the dotted line connection to Start.
The key to the flexibility of RTC 2014 is its ability to control and sense every operational step by dataway commands and/or by front panel signals.
Only one bit of the control register is allowed to be non-zero at a time. Step-down ratios are as follows:
| Control reg. bit | no W | W1 | W2 | W3 | W4 | W5 | W6 | W7 |
|---|---|---|---|---|---|---|---|---|
| Step-Down Ratio | closed | 20 | 23 | 26 | 29 | 212 | 215 | 218 |
| 1 | 8 | 64 | 512 | 4096 | 32768 | 262144 |
W1 to W16 is a binary integer: the number of time increments or pulses to be counted (multiplied by the step-down ratio). After this command, the counting register holds the one's complement of this integer.
The read process stops the counter for a fraction of the dataway operation (from t0 to t6, refer to figure 9, EUR 4100 e), in order to avoid ambiguous reading. A single pulse occurring during this interval is restored to the counter at S2. Thus, readout on the flight is possible without loss if the reciprocal of the pulse rate - after the divider - is larger than the interval t0 - t6. At higher rates, the losses are generally negligible.
All inputs and outputs of the RTC 2014 accept or deliver NIM compatible levels or pulses. Output drivers sink 16 mA in the "1" state and inputs accept -800 mV as "1". For more details, please refer to table IX in EUR 4100 e. All connectors are LEMO RA 00 C50.
INPUTS
OUTPUTS
a) Timer
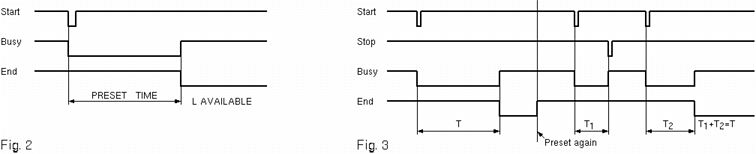
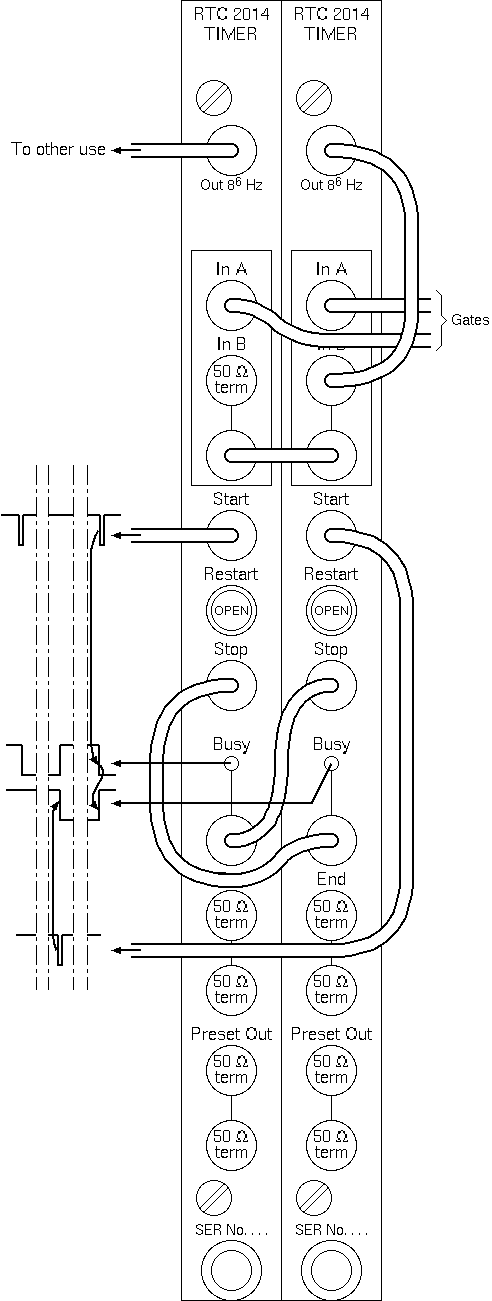
After Start, Busy is on and available as a gate to external equipment, see figure 2. The completion of the timing operation is signalled to the program by an L-request, to the experimental world by End and Busy. The Start command is supplied either by a pulse or by a programmed command. In the latter case, a connection Preset Out - Start must be established. Figure 3 shows the effect of a Stop command during the timing operation.
The output of the time base oscillator, Out 86 Hz, is supposed to be connected to InA. If a pulse train other than the time base oscillator is supplied to InA (or InB), the timer becomes a "preset counter".
b) Clock Generator
Making a connection from Out 86 Hz to InA and feeding End back to Restart provides a free running clock generator. Pulses of about 100 ns duration are available at End. The clock rate is only dependent upon the step-down ratio:
| Step-down ratio | 20 | 23 | 26 | 29 | 212 | 215 | 218 |
|---|---|---|---|---|---|---|---|
| Clock period | 1/4 s | 2 s | 16 s | 128 s | 1024 s | 8192 s | 65536 s |
At the end of every period, an L-request is issued. This L may be used to interrupt the current program in the processor. Provision must be made to service the interrupt before the next clock period.
c) Elapsed Time Meter and Day Time Clock
The readout on the flight and the front panel commands allow many useful arrangements.
The Elapsed Time Meter measures the time between an initial event (t0) and a second event (t1). The instants t0 and t1 are sometimes given by pulses - t0 into Restart and t1 into Stop - or are defined by the program, say, in response to a certain interrupt routine. The program then uses function 28 at t0 and reads the counter on the flight at t1 by function 0.
High resolution timing, however, is only possible with pulse commands. Once started at t0, the current counter content can be transferred to the processor as often as desired. A hardware Day Time Clock results.
Single width CAMAC module with sheet metal covers, fiber-glass circuit board and all TTL integrated circuits. It meets all electrical and mechanical requirements of EUR 4100 e report.
+6 V 640 mA -6 V 90 mA
Gates are represented in the schematics by the following symbols

Flip-Flops and other complex circuits use a rectangular symbol. Designators inside the symbols refer to the actual function of the lead in the particular application.
Numbers inside a symbol always refer to the IC package in the location chart, while numbers beside a lead refer to the pin position.
Through inverters 56 and 57, IC's 54 and 55 (TEXAS MSI Binary to BCD decoders) as well as gates 45, 46 and 53, all functions are fully decoded and multiplied by N and the partially decoded sub-addresses.
Z and S2 are multiplied to deliver, on the one hand, the Initialize signal (gate 47) and, on the other hand, through a one-shot, IC 58, a reset of the 16 bit Preset Counter. Thus, after initialization, clear signals are sent to the whole module.
The two CAMAC dataway strobes S1 and 52 are respectively the set and reset of the DCF (gates 53) which delivers therefore a >=300ns pulse. This pulse is used to strobe data into the preset counter during a dataway preset (gates 44 and 47) or a start at zero (gates 6 and 18).
The enable/disable flag, dataway L, is control led by a set: FCT 26 SAD 0, and a reset: FCT 24 SAD 0, both strobed by S1 (gates 47). ELF (gates 6 and 7) is of course cleared by Initialize. ELF only controls but does not affect the causes of the dataway actions on the L signals. L is the true output of the done flag DNF (gates 48 and 19), conditioned by ELF (gate 9) and CAMAC dataway signal B (gate 49). DNF is set by appearance of END (see below). The Clear L flag CLF (gates 9) inhibits END after being cleared by the Clear L, FCT 10 SAD 0 at S2, till the next BUSY ON. DNF is cleared by Initialize, by the start of any RTC cycle and the Clear L, when L is enabled (via gates 10 and 9).
When L is enabled and tested, Q becomes its image. Gate 48 sums the functions giving a Q-response. When the BYF flip-flop is tested by FCT 27 SAD 0, Q becomes an image of BUSY.
For automatic restart the RSF (gates 7) is set by a signal on RESTART. False output of the flip-flop is multiplied by BSY (gate 7) to start again the module synchronously with IN (gate 49). At the same time, added to the stretched initialize and start at zero function, it resets the Preset Counter (gate 6 and 18). RSF is cleared by BSY.
You will find hereafter developed expressions of useful functions and controls. FCT will be written for the completely decoded function (multiplied by N) instead of long expressions with many "F"s.
                                          __ __
Read(IC 57.8)                      = FCT0·A1·A2
                                                    __ __
Test L (IC 10.6)*                  = (FCT8 + FCT10)·A1·A2
                                           __ __
Clear L (IC 44.6)                  = FCT10·A1·A2·S2
                                           __ __
Overwrite Preset Counter (IC 44.8) = FCT16·A1·A2·DCF
                                           __ __
Preset out (IC 44.11)              = FCT16·A1·A2·S2
                                              __
Overwrite Divider (IC 44.3)        = FCT16·A1·A2·S1
                                           __ __
Disable L (IC 6.12)                = FCT24·A1·A2·S1 + Initialize
                                           __ __
Enable L (IC 47.11)                = FCT26·A1·A2·S1
                                           __ __
Test Busy Done (IC 49.2)           = FCT27·A1·A2
                                           __ __
Start at Zero (IC 47.8)            = FCT28·A1·A2·DCF

*IC 10.6 means IC 10 pin 6
The counter consists of four MSI circuits (IC's 26, 34, 41 and 50) which include preset gates for the four D-FF of each MSI. This counter works on two's complement principle, in order to avoid carry timing problems.
The first D-FF is driven by a clock coming from IC 16.8 through gate 17. Qutputs are summed in gates 39 and 40 to deliver the END signal via gate 37, but they also go to the inputs of the read buffers.
When a Read command occurs it transfers the actual value of the counter outputs to the R-bus via gates 28, 36, 43 and 52. These values stay until the occurrence of S2. If a clock pulse appears during this time it sets CMF, putting the clock line at "1"on IC 17.4. This does not affect the counter status which works on the other edge of the clock pulse. An occurrence of S2 turns RCF and CMF to zero, producing the clock effect and opening gate 17. False RCF output is used to inhibit setting CMF again. Disappearance of Read turns RCF to "1".
The divider works as a pure binary 18 bit counter. Four MSI 4 bit counters (IC's 3, 12, 21 and 31) are used and a dual D-FF (IC 38) completes the last two bits. The 18 flip-flops form six groups of 3 consecutive FF being multiplied to give the division of the power of eight. A MSI register (IC's 13 and 14) selects, by means of gates 4 and 5, a predefined frequency for the preset counter via inverter 16. Overwriting of the MSI register is performed by the overwrite divider function. The register is cleared by an imposed zero status at the outputs of gates 22 and 23 (by means of Z) and Initialize on gate 18.9. Start and stop synchronization is achieved with a D-FF (IC 2a), clocked by the input and whose action 5 to gate the clock (gate 15).
As a preset operation is performed, the END signal becomes false and the input D-FF (IC 2a) is allowed to work. With the set action of the busy flag BYF, BSY holds the D input of the flip-flop at "1". Thus, the first clock on the IN line causes the D-FF to be set. Because of the positive edge action of the clock and the true clock applied on pin 11, the flip-flop may change its status only during clock pulse disappearance. Therefore gate 15 delivers only entire pulses at its pin 8, provided input frequency does not exceed TTL speed capability.
It is then evident that the first input pulse will never be counted because D is effective only if the clock is at "1".
When a wrong operation is started and you do not want to wait till its end, proceed as follows to avoid using an Initialize operation:
Some typical uses of the RTC 2014 are described hereafter.
Typical dataway commands and controls
a) OP 1  Initialize: Z·S2
                              __ __ __ __        __
b) OP 2  Overwrite Divider: N·F1·F2·F4·F8·F16·A1·A2·S1
         Input frequency is divided by the selected power of 8 (W-bus 1 to 7).
                           __ __ __ __     __ __
c) OP 3  Preset Counter: N·F1·F2·F4·F8·F16·A1·A2·S1
         Counter is containing the W-bus pattern (1 to 16)
         Preset number · selected power of 8 · input frequency period
         gives the duration of "Busy".
                  __ __ __ __     __ __
d) OP 4  Start: N·F1·F2·F4·F8·F16·A1·A2·S2
         A pulse corresponding to S2 starts a cycle.
                 __ __ __ __ ___ __ __
e) OP 5  Read: N·F1·F2·F4·F8·F16·A1·A2
         Counting of "Preset Counter" is stopped and no clock is lost
         when the period at the input of the Preset Counter is bigger
         than the time between the front edge of N·Fi·Aj and S2.
                     __    __        __ __
f) OP 6  Enable L: N·F1·F2·F4·F8·F16·A1·A2·S1
         L appears as soon as the END output turns to "1".
			Then "Busy" returns to zero.
                   __ __ __    ___ __ __
g) OP 7  Test L: N·F1·F2·F4·F8·F16·A1·A2
                   __    __    ___ __ __
         or:     N·F1·F2·F4·F8·F16·A1·A2
                    __    __    ___ __ __
h) OP 8  Clear L: N·F1·F2·F4·F8·F16·A1·A2·S2
         Care must be taken when using this last function
         so that L does not occur between its strobe signal S1 and
         its clear signal S2 otherwise L may be lost.
         L is also cleared by a new OP 3.      __ __ __        __ __
         If L is not enabled or is disabled (N·F1·F2·F4·F8·F16·A1·A2·S1),
         no actions are possible on it through the dataway.

         3.8 µs <= BUSY <= 18.2 h (18h12'15'')
Typical dataway commands and controls
a) OP 2  Overwrite Divider

b) OP 6  Enable L
                          __ __           __ __
c) OP 9  Start at zero: N·F1·F2·F4·F8·F16·A1·A2·DCF

d) OP 7, 8 and 5  may be used to know the actual status.
         As L occurs synchronously with END it is necessary
         to read and clear it before the next occurrence,
         otherwise it will be lost.

e)       To stop the clock generation you may use one of the
         following operations:

         OP 1

         OP 3 with Sum1->16(Wi) = 0
              and "Restart-End" connection removed.

         OP 2 with Sum1->7(Wi) = 0
              will stop the internal clock, then
              OP 3 with Sum1->16(Wi) = 0
              will deliver an END.

         Remark: in the last method, if "Restart-END" connection
         is not removed, the BUSY will be ON with the END!


         0,25 s <= Period <= 18,2 h

Typical dataway commands and controls
a) OP 1  Initialize: (Not necessary if it was done before)

b) OP 2  Overwrite Divider

c) OP 3  Preset Counter: Because of input synchronisation,
         the first "IN" pulse will not be counted;
         as a matter of fact it is used to open the "IN" gate.

d) OP 4  Start: and so on...


         20 <= Preset nb <= 234-1
         (~ 17,18·:109)
Typical dataway commands and controls
a) OP 2  Overwrite Divider (if necessary after OP 1)

b) OP 9  Start at zero one unit
         External "START" on one unit will start it
         and stop the second one.
                            __        __ __
c) OP 10 Test Busy: N·F1·F2·F4·F8·F16·A1·A2
         and OP 5 may be used to know modules status.
         Total time is given by addition.